
The Ultimate Guide to Cookie Decorating Buttercream
Master the art of making smooth, pipeable, and delicious buttercream frosting perfect for decorating cookies—with pro tips, techniques, flavor ideas, troubleshooting, and a helpful
Cookie decorating buttercream is a softer, creamier version of classic buttercream that holds its shape beautifully for piping while remaining smooth enough to spread. Unlike royal icing, which dries hard and glossy, buttercream remains soft to the bite—making it a favorite for those who prioritize flavor and texture alongside visual appeal.
This buttercream:
- Pipes clean details (stars, swirls, florals, borders).
- Tastes rich and buttery—not overly sweet.
- Is easy to work with, even for beginners.
- Is ideal for sugar cookies, shortbread, or chocolate cut-outs.

🧈 Key Ingredients (And Why They Matter)
1. Unsalted Butter (1 cup / 2 sticks)
- Use room temperature butter for best mixing.
- Unsalted gives you better control over flavor.
- High-quality butter makes a noticeable difference in taste.
2. Powdered Sugar (3½ to 4 cups)
- Also called confectioners’ sugar or icing sugar.
- It dissolves easily and creates that silky-smooth texture.
- Adjust amount for consistency—less for spreading, more for stiff piping.
3. Heavy Cream or Milk (2–4 tablespoons)
- Use cream for a richer, fluffier buttercream.
- Add slowly to adjust the thickness of your frosting.
- Milk works too but offers a thinner result.
4. Pure Vanilla Extract (1–2 teaspoons)
- Use high-quality extract for the best flavor.
- Optional: Try almond, lemon, or peppermint extracts for a twist.
5. Salt (¼ teaspoon)
- Balances sweetness and enhances flavor.
Optional Add-Ins:
- Gel food coloring (for vibrant decorating)
- Cocoa powder (for chocolate buttercream)
- Espresso powder (for mocha flavor)
- Fruit purees (like freeze-dried raspberry or strawberry powder)
🧑🍳 How to Make Cookie Decorating Buttercream
Step 1: Cream the Butter
- Beat softened butter on medium-high speed for 3–4 minutes until pale, fluffy, and smooth.
- Scrape down the bowl to ensure even mixing.
Step 2: Add Powdered Sugar Gradually
- Add powdered sugar 1 cup at a time, beating slowly at first to avoid a sugar cloud.
- Once incorporated, beat on high for 1 minute between additions.
Step 3: Add Vanilla, Salt, and Cream
- Add vanilla and salt, then start with 2 tablespoons of cream.
- Mix on medium-high until the buttercream is light and silky.
- If needed, add more cream 1 teaspoon at a time to adjust the texture.
Step 4: Beat for Structure
- Beat the frosting for an additional 2–3 minutes to aerate it fully.
- The final buttercream should be:
- Smooth for spreading
- Stiff enough to hold piped shapes
- Not greasy or gritty
📏 Buttercream Consistency Guide
| Consistency | Best For | Description | Adjustments |
|---|---|---|---|
| Stiff | Flowers, borders, lettering | Holds shape very well | Use less cream and more powdered sugar |
| Medium | Swirls, basic piping | Smooth, but firm enough to hold | Balance of sugar and cream |
| Soft | Spreading, background layers | Easily spreadable | Add more cream or a touch of milk |
Pro Tip: Always test your consistency by piping a swirl or dot before decorating your cookies.
🎨 Coloring Buttercream: Tips for Vibrant Results
✅ Use Gel Food Coloring
- Gel is highly pigmented and won’t water down the frosting.
- Avoid liquid food coloring—it changes consistency and weakens structure.
✅ Color in Advance
- Buttercream colors deepen over time. For rich reds, blues, or blacks, mix the day before and store covered.
✅ White Buttercream Tip
- Add a tiny drop of purple gel to offset the yellow tint from butter for a whiter finish.
🧁 How to Decorate Cookies with Buttercream
🥄 Tools You’ll Need
- Piping bags (disposable or reusable)
- Metal piping tips (Wilton 1M, 2D, 104, round tips)
- Offset spatula or butter knife
- Scribe or toothpick (for detail work)
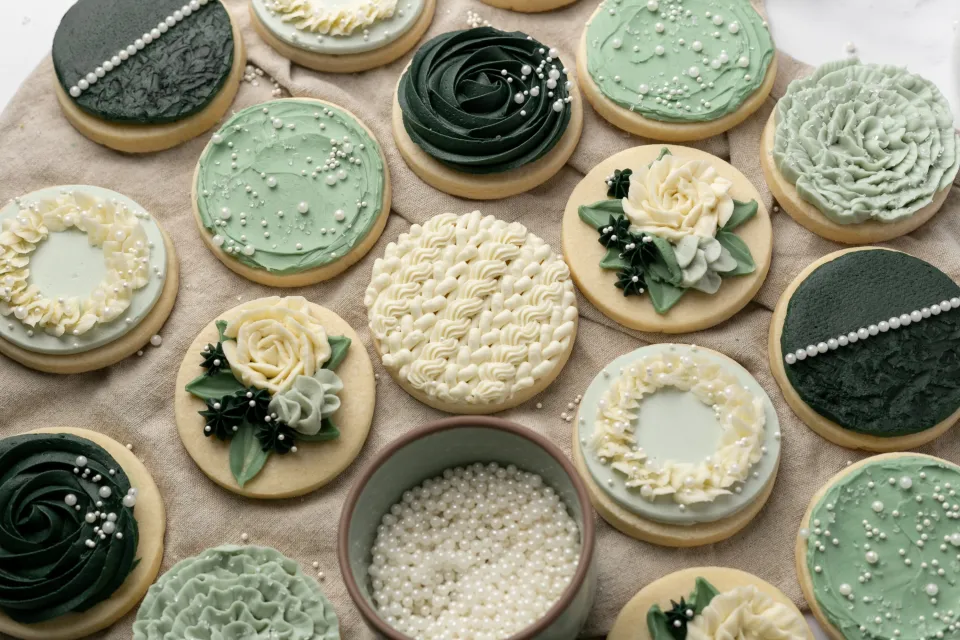
🎨 Techniques to Try
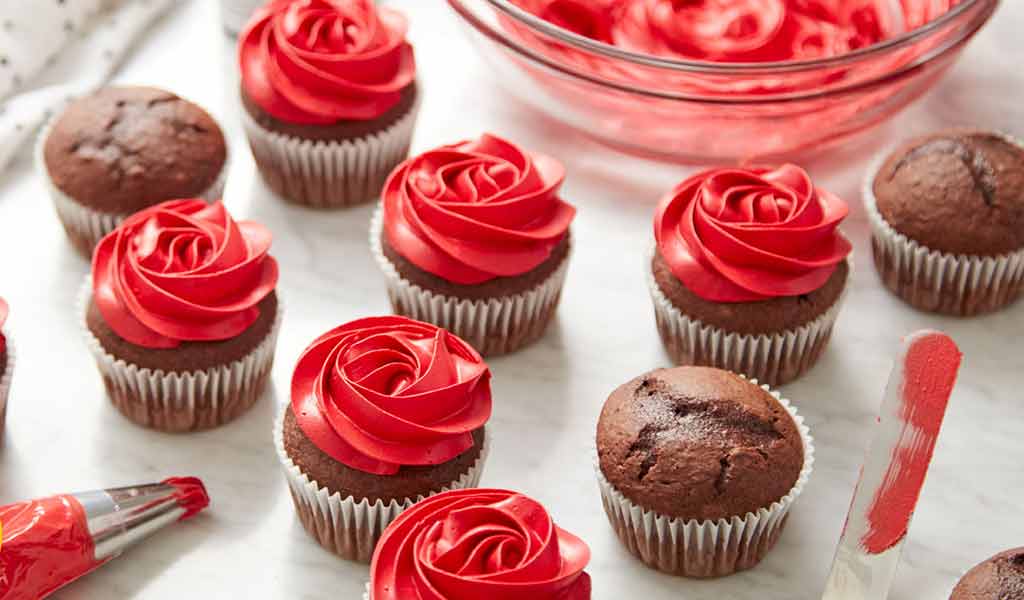
1. Classic Piping
- Outline and fill with stars, rosettes, or shells using star tips.
2. Textured Spreading
- Use a spatula to swirl buttercream artistically—great for floral or abstract cookies.
3. Layered Designs
- Pipe base shapes, chill for 10 minutes, then add contrasting elements on top.
4. Rosettes and Leaves
- Use Wilton 1M for rosettes and #352 for leaves. Practice on parchment before decorating.
❄️ Storage & Shelf Life
| Storage Method | Duration | Tips |
|---|---|---|
| At room temp | 2–3 days | Store in airtight container away from heat. |
| Refrigerated | 1 week | Let come to room temp and re-whip before using. |
| Frozen | 2–3 months | Thaw in fridge overnight, then beat to restore texture. |
Note: Decorated cookies are best stored in a single layer. Do not stack unless frosting has crusted (hardened slightly on top).
🌿 Flavor Variations
Customize your buttercream to match any theme or season!
🍫 Chocolate Buttercream
- Add ¼ cup unsweetened cocoa powder.
- Substitute 1 tbsp cream with brewed coffee for mocha flavor.
🍓 Berry Buttercream
- Mix in 2 tbsp of freeze-dried fruit powder (like strawberry or raspberry).
- Adds color and natural flavor.
🍋 Lemon Buttercream
- Add 1 tsp lemon zest + 1 tbsp fresh lemon juice.
- Great for spring or floral-themed cookies.
🌰 Nut Buttercream
- Add 2 tbsp peanut butter or Nutella for a rich twist.
- Pairs beautifully with chocolate or banana cookies.
🛠️ Common Mistakes & How to Fix Them
| Problem | Cause | Fix |
|---|---|---|
| Too soft/runny | Too much liquid | Add more powdered sugar, chill slightly |
| Too stiff/dry | Not enough liquid | Add milk or cream a teaspoon at a time |
| Gritty texture | Poor sugar quality or underbeaten | Beat longer and use 10X powdered sugar |
| Yellow tint | Natural butter color | Add a speck of violet food coloring or use shortening blend |
| Air bubbles | Overbeating at high speed | Mix gently on low before piping |
🎁 Gifting Buttercream Cookies

🎀 Tips for Packaging:
- Let frosting crust for at least 2 hours before packaging.
- Use cupcake liners or parchment between layers to prevent smearing.
- Avoid stacking if transporting in warm weather.
🧊 Freezing Decorated Cookies:
- Flash freeze cookies on a tray until solid.
- Layer in airtight containers with parchment.
- Thaw at room temperature in the container to prevent condensation.
🍪 Pairing Ideas for Cookie Dough + Buttercream
| Cookie Base | Best Buttercream Pairing | Notes |
|---|---|---|
| Sugar Cookies | Vanilla or Lemon | Classic pairing |
| Chocolate Cookies | Mocha or Raspberry | Deep and rich |
| Shortbread | Almond or Berry | Delicate and buttery |
| Gingerbread | Cinnamon or Cream Cheese | Great for holidays |
| Peanut Butter | Chocolate or Marshmallow | Childhood favorite flavors |
Table of Contents
📋 Frequently Asked Questions
1. Can I leave buttercream cookies at room temperature?
Yes, for 2–3 days. Buttercream made with dairy is safe unrefrigerated for short periods. For longer storage, refrigerate or freeze.
2. What piping tips are best for beginners?
Start with:
- Wilton 1M (rosettes & swirls)
- Round tip #12 (dots & lettering)
- Star tip #21 (classic designs)
3. How do I fix runny buttercream?
Add ¼ cup powdered sugar at a time or refrigerate the bowl for 10–15 minutes before trying again.
4. Can I color buttercream with natural ingredients?
Yes! Try:
- Beet powder (pink)
- Matcha (green)
- Turmeric (yellow)
- Cocoa powder (brown)
Natural colorings are more muted but beautiful.
5. Does buttercream harden on cookies?
Yes, it crusts slightly on the surface after 4–6 hours, making them stackable (if chilled). It doesn’t harden like royal icing, but firms enough to package.
6. Can I use shortening instead of butter?
Yes, use ½ butter + ½ shortening for a whiter and more heat-stable frosting. Ideal for humid climates or long transport.
7. Is this frosting suitable for kids to decorate with?
Absolutely! It’s soft, pipeable, safe to eat uncooked, and fun to color. Just prep piping bags in advance and let the kids go wild.
🎉 Final Thoughts
Whether you’re decorating sugar cookies for a birthday party, building holiday cookie boxes, or just want a sweet creative outlet, buttercream is a versatile, delicious, and beginner-friendly choice.
Unlike stiff royal icing, buttercream offers a smooth, creamy texture and rich taste that elevates every bite. With the right tools, colors, and practice, you’ll be able to decorate cookies that look bakery-worthy—without the stress.