

Absolutely! Here’s a fully optimized, in-depth, and beginner-friendly 2000-word guide on:
Homemade Oreos: Rich, Crisp Chocolate Cookies With Creamy Vanilla Filling
Discover how to make your own Oreos at home—better than store-bought, bursting with real cocoa flavor, and filled with luscious vanilla cream.
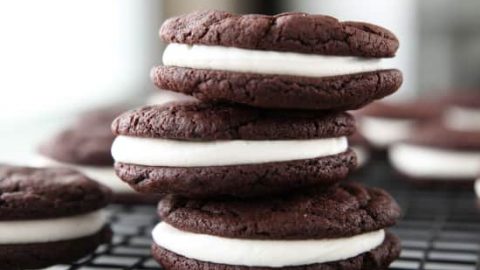
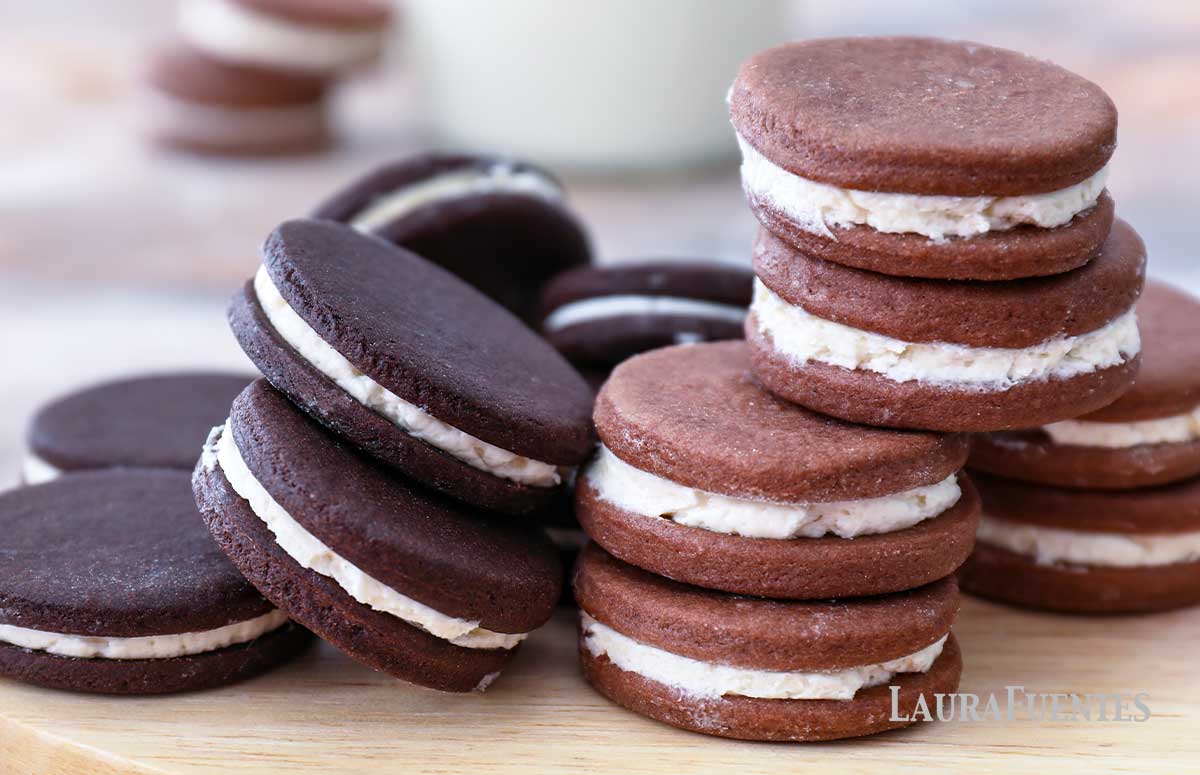
Everyone knows and loves Oreos—but have you ever tried making them from scratch? Homemade Oreos bring everything you love about the iconic cookie—dark, crisp chocolate wafers and smooth, sweet vanilla cream—only better. With higher quality ingredients, no preservatives, and the ability to customize everything from sweetness to texture, these cookies are a game-changer.
In this ultimate guide, you’ll learn how to make the chocolate cookies, whip up the perfect filling, store and freeze them, troubleshoot common problems, and even experiment with flavor variations. Let’s get baking!
🍪 What Makes Homemade Oreos So Special?
✔️ Deep, rich chocolate flavor from real cocoa
✔️ Crispy yet tender wafers that melt in your mouth
✔️ Creamy vanilla filling with adjustable sweetness
✔️ Customizable—make them gluten-free, double-stuffed, or colored
✔️ No preservatives or artificial flavors
✔️ Impressive gifts or lunchbox treats
🧾 Ingredient Breakdown
Let’s break down the ingredients and why each one matters:
For the Chocolate Cookies:
- All-purpose flour – Gives structure and crispness
- Dutch-process cocoa powder – Milder and darker than natural cocoa; essential for Oreo flavor
- Baking soda – Helps the cookies puff slightly while keeping them crisp
- Salt – Balances sweetness and enhances chocolate
- Unsalted butter – Adds richness and flavor
- Granulated sugar – Sweetens and contributes to crunch
- Egg – Binds the dough
- Vanilla extract – Adds depth
For the Vanilla Cream Filling:
- Unsalted butter – Creamy base for the filling
- Powdered sugar – Sweetens and creates smooth texture
- Vanilla extract – Key to that classic Oreo flavor
- Milk or cream (optional) – Helps adjust consistency
🍫 Homemade Oreo Cookies: Step-by-Step Recipe
Yield: About 24 sandwich cookies (48 individual cookies)
🧈 Ingredients
Chocolate Wafers:
- 1 1/4 cups all-purpose flour
- 3/4 cup Dutch-process cocoa powder
- 1 tsp baking soda
- 1/2 tsp salt
- 1 cup granulated sugar
- 10 tbsp unsalted butter, softened
- 1 large egg
- 1 tsp vanilla extract
Vanilla Cream Filling:
- 1/2 cup (1 stick) unsalted butter, softened
- 1 3/4 cups powdered sugar, sifted
- 1 tsp vanilla extract
- 1–2 tsp milk or cream (optional, for spreading consistency)
🔪 Instructions
Step 1: Make the Chocolate Dough
- In a large bowl, whisk together flour, cocoa powder, baking soda, and salt.
- In another bowl, beat butter and sugar until light and fluffy (2–3 minutes).
- Add the egg and vanilla and mix until well combined.
- Gradually add the dry ingredients to the wet ingredients. Mix until the dough comes together—it will be stiff.
Step 2: Roll and Cut
- Divide the dough in two, flatten into discs, and chill for 30–45 minutes.
- Preheat oven to 350°F (175°C) and line baking sheets with parchment.
- Roll dough between two sheets of parchment to about 1/8-inch thickness.
- Cut into 2-inch rounds using a cookie cutter. Gather and re-roll scraps.
Step 3: Bake
- Place cookies about 1 inch apart on baking sheets.
- Bake for 8–10 minutes or until edges are set and centers are dry.
- Let cool on sheet for 5 minutes, then transfer to wire rack to cool fully.
Step 4: Make the Filling
- Beat butter until creamy.
- Gradually add powdered sugar, then vanilla.
- Add milk or cream 1 tsp at a time until desired spreadable consistency is reached.
Step 5: Assemble the Sandwiches
- Pipe or spread about 1 tablespoon of filling onto the flat side of one cookie.
- Top with another cookie and press gently until the filling spreads to the edges.
💡 Pro Tips for Oreo Perfection
- Use Dutch-process cocoa powder: This gives that deep, almost black Oreo color and a mellow chocolate flavor.
- Chill the dough: Makes it easier to roll and prevents spreading.
- Don’t overbake: The cookies firm up as they cool. Overbaking = bitter, dry cookies.
- Use a piping bag for even filling: A cleaner, more professional look.
- Double-stuffed fan? Add more filling—go wild!
🍬 Flavor Variations
🍓 Strawberry Oreos
Add 1/2 tsp freeze-dried strawberry powder to the cream filling and a drop of pink food coloring.
🌰 Chocolate-Hazelnut Oreos
Replace half the filling butter with Nutella for a rich hazelnut twist.
🥥 Coconut Filling
Add 1 tbsp shredded coconut and 1/2 tsp coconut extract to the filling.
🍋 Lemon Cream
Add 1 tsp lemon zest and a few drops of lemon juice to the vanilla cream for a citrusy surprise.
🎃 Pumpkin Spice
Add 1/4 tsp pumpkin spice to the cookie dough and flavor the filling with cinnamon or nutmeg.
🧊 Storage and Make-Ahead Tips
Storage:
- Store cookies in an airtight container at room temperature for up to 5 days.
- Refrigerate to extend freshness to about a week.
Freezing:
- Unfilled cookies freeze beautifully for up to 2 months.
- Filled cookies can be frozen but may soften slightly when thawed. Wrap tightly in plastic wrap or foil and store in a freezer-safe bag.
Make-Ahead:
- Cookie dough can be made and chilled up to 3 days in advance.
- The cream filling can also be prepped ahead and refrigerated—bring to room temperature before spreading.
🍽️ Nutritional Information (Per Cookie Sandwich – Approximate)
| Nutrient | Amount |
|---|---|
| Calories | 180–210 kcal |
| Fat | 9–11 g |
| Carbs | 25–28 g |
| Sugar | 15–18 g |
| Protein | 2–3 g |
| Fiber | 1–2 g |
❓ Frequently Asked Questions (FAQs)
Q: Can I use natural cocoa powder?
A: Technically yes, but you’ll get a lighter color and more acidic flavor. Dutch-process cocoa is highly recommended for that classic Oreo taste and look.
Q: Can I make these gluten-free?
A: Absolutely! Use a 1:1 gluten-free flour blend that includes xanthan gum. Texture will be slightly different but still delicious.
Q: Why is my dough too soft or sticky?
A: If it’s too warm, refrigerate it for 30–45 minutes before rolling. Sticky dough is harder to cut cleanly.
Q: Can I make these vegan?
A: Yes! Use vegan butter, a flax egg (1 tbsp flax + 3 tbsp water), and plant-based milk in the filling.
Q: Can I reduce the sugar?
A: Slightly. Reducing more than 2–3 tablespoons may affect texture and flavor. You can also reduce sweetness by using less filling.
Q: How do I get perfectly round cookies?
A: Use a sharp round cookie cutter and rotate slightly as you press down. For smooth edges, chill the dough before cutting.
Q: What’s the best way to package these as gifts?
A: Stack 4–6 sandwich cookies in a cellophane bag tied with ribbon, or place in decorative tins with wax paper between layers.
🎉 Fun Ideas for Serving & Gifting
- Cookie platters for holidays
- DIY Oreo gift kits (add milk bottles or hot chocolate packets)
- Kids’ baking parties
- Teacher or neighbor gifts
- Wedding or shower favors
They’re nostalgic and impressive—everyone will love a homemade Oreo!
🌟 Final Thoughts: Why You’ll Never Go Back to Store-Bought
Homemade Oreos take a little time, but the payoff is huge. You control the quality of ingredients, the level of sweetness, and can even personalize the flavors. The result? A more chocolatey, more satisfying, and undeniably special treat.
Whether you’re baking for a party, a loved one, or just your own cookie craving, these homemade Oreos are bound to become a favorite.